Category: Know-how

  • Limiting Parallel Jobs in Snakemake Using Resources

    Introduction

    When running computationally intensive workflows with Snakemake, you might encounter issues where too many jobs are running in parallel, causing excessive I/O load, memory pressure, or high latency on your hard drive. This can lead to failed jobs or degraded performance.

    Snakemake provides a way to limit parallel execution per rule using the resources directive, but this only works if you also specify a global resource limit when executing the workflow.

    In this blog post, we will demonstrate how to properly limit the number of parallel jobs for a specific rule using Snakemake’s resource management system.


    The Problem: Too Many Jobs Running at Once

    Consider the following Snakemake rule:

    rule process_data:
        input:
            "{sample}.raw"
        output:
            "{sample}.processed"
        resources:
            process_data_jobs=1  # Assign a resource unit for limiting the number of jobs
        shell:
            """
            some_tool --input {input} --output {output}
            """

    Why Doesn’t resources Alone Limit Job Execution?

    You might expect that setting resources: processing_jobs=1 would automatically limit Snakemake to running only 1 job at a time. However, Snakemake does not enforce resource-based scheduling unless you specify a global limit when launching the workflow.

    Without a global limit, Snakemake may still launch too many jobs in parallel, overloading your system.


    The Solution: Enforce Resource Limits

    To actually restrict the number of parallel jobs, run Snakemake with:

    snakemake --resources process_data_jobs=10

    How Does This Work?

    • Each job of process_data requests 1 unit of process_data_jobs.
    • The global limit processing_jobs=10 ensures that at most 10 jobs (10 / 1 = 10) run in parallel. You can also set different units, if you like

    Before setting this limit, too many jobs could be running at once! After applying it, only 10 jobs were allowed to run simultaneously.


    Conclusion

    If you are facing high disk latency, I/O pressure, or excessive job execution in Snakemake, the best way to control it is by:

    1. Using resources to define per-job resource requirements.
    2. Setting a global resource limit (--resources processing_jobs=10) when executing Snakemake.

    This approach ensures your workflow runs efficiently and reliably without overloading your system!
  • Finding Files in My Folders

    Managing disk space efficiently is essential, especially when working on systems with strict file quotas. Recently, I encountered a situation where I had exceeded my file limit and needed a quick way to determine which folders contained the most files. To analyze my storage usage, I used the following command:

    for d in .* *; do [ -d "$d" ] && echo "$d: $(find "$d" -type f | wc -l)"; done | sort -nr -k2

    Breaking Down the Command

    This one-liner efficiently counts files across all directories in the current location, including hidden ones. Here’s how it works:

    • for d in .* * – Loops through all files and directories, including hidden ones.
    • [ -d "$d" ] – Ensures that only directories are processed.
    • find "$d" -type f | wc -l – Counts all files (not directories) inside each folder, including subdirectories.
    • sort -nr -k2 – Sorts the results in descending order based on the number of files.

    Why This is Useful

    With this command, I quickly identified the directories consuming the most inodes and was able to take action, such as cleaning up unnecessary files. It’s an efficient method for understanding file distribution and managing storage limits effectively.

    Alternative Approaches

    If you only want to count files directly inside each folder (without subdirectories), you can modify the command like this:

    for d in .* *; do [ -d "$d" ] && echo "$d: $(find "$d" -maxdepth 1 -type f | wc -l)"; done | sort -nr -k2

    This variation is useful when you need a more localized view of file distribution.

  • Couldn’t delete a failed R package installation

    Today I faced a strange thing, while I tried to install an update to one of my R-packages. As usually, I installed the latest version from it like this

    library("devtools")
    install_github("fischuu/GenomicTools")

    But the installation failed, and when I tried to reinstall it, I got this error message:

    Installing package into ‘/homeappl/home/<user>/R/x86_64-redhat-linux-gnu-library/4.1’
    (as ‘lib’ is unspecified)
    ERROR: failed to lock directory ‘/homeappl/home/<user>/R/x86_64-redhat-linux-gnu-library/4.1’ for modifying
    Try removing ‘/homeappl/home/<user>/R/x86_64-redhat-linux-gnu-library/4.1/00LOCK-GenomicTools’
    Warning message:
    In i.p(...) :
      installation of package ‘/tmp/Rtmp<...>Lv/file3c36<...>34/GenomicTools_0.2.11.tar.gz’ had non-zero exit status

    So, I tried to go in said directory and delete the folder manually and there I received another error:

    rm: cannot remove '00LOCK-GenomicTools/GenomicTools/libs/.nfs00000001002e2<...>d': Device or resource busy

    I tried this and this, but nothing helped to delete that folder, it kept mocking my that the device is busy. Eventually, it helped just to rename the folder list this

    mv 00LOCK-GenomicTools/ 00LOCK-GenomicTools-deleteThis/

    It is now still hanging there in the folder, but I was able to reinstall the R-package and now I need to revisit the folder in a few days and check, if the device is still busy or if I can delete it then…

  • Git submodules

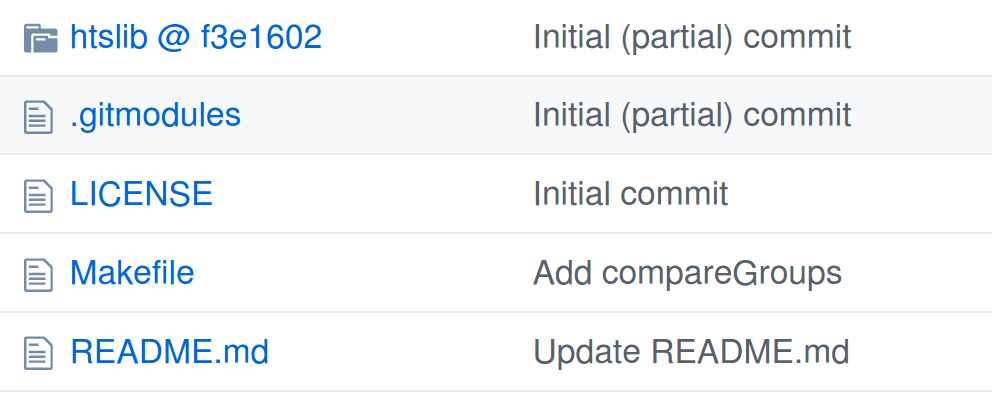
    Today I noticed for the first time the concept of submodules in git. While cloning a repository from GitHub I noticed that one folder in it remained empty. After having a closer look, I noticed a reference to another repository tree like this:

    Here, the folder htslib is actually from a tree in a different repository. After I cloned the repository like this (I forked it before):

    git clone https://github.com/fischuu/SE-MEI.git

    the folder htslib remained empty. That is because files from submodules are not fetched by default. This needs to be done separately by first initializing the submodules (first, cd into the cloned repository)

    git submodule init

    and then update the files from it

    git submodule update

    After these steps, the repository should be complete. However, instead of initializing the submodule separately, there is also a shortcut to fetch them all in one step by adding an additional parameter to the cloning like this:

    git clone --recurse-submodules https://github.com/fischuu/SE-MEI.git

    More details to git submodules can be found here.

  • Adding an external HDD to fstab

    In order to permanently add an external HDD, the best way is to first identfy the UUID and the corresponding file system by typing

    sudo blkid

    with that information one can edit the fstab

    sudo vim /etc/fstab

    and enter then there a line with the format

    UUID=<UUID> \tab <mountPoint> \tab <filesystem> \tab <options> \tab 0 \tab 1

    Here, the values for <UUID> and <filesytem> we get from the blkid command, the mount point is ‘free choice’ and as option, I choose e.g. errors=remount-ro

    Once the fstab is populated like this, just try to mount the disc by typing

    sudo mount -a